🏖️ Outer Banks Secrets
Outer Banks sits at Stage 3 of the run — North Carolina, USA. Every hidden artifact, message in a bottle, and legendary catch in this world is documented below with YouTube timestamps and pickup walkthroughs.
▣ Artifacts
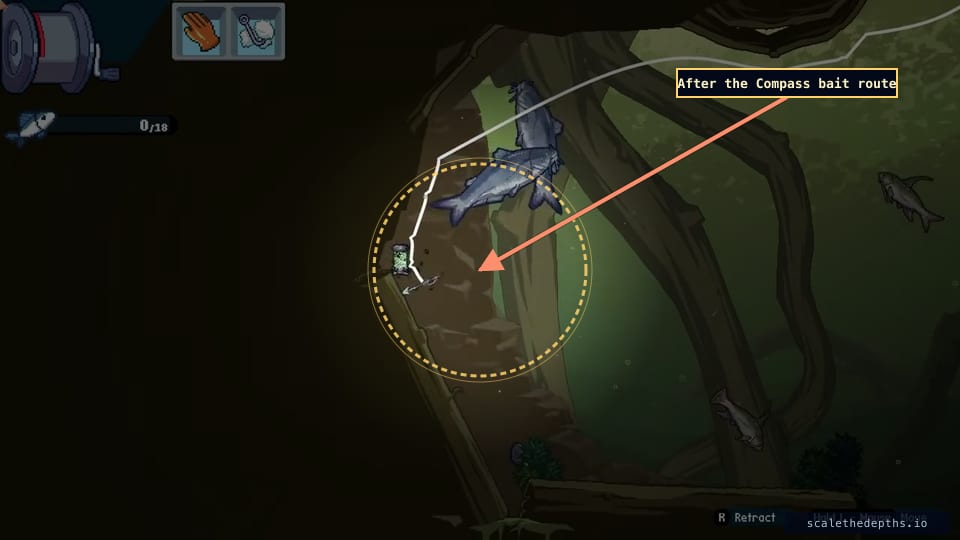
Bio-specimen Containment Unit →
Outer Banks' second artifact — a sci-fi specimen jar tucked into the middle Compass route, picked up just after the Compass bait and a money chest and right before the Lost Dimetrodon marker.
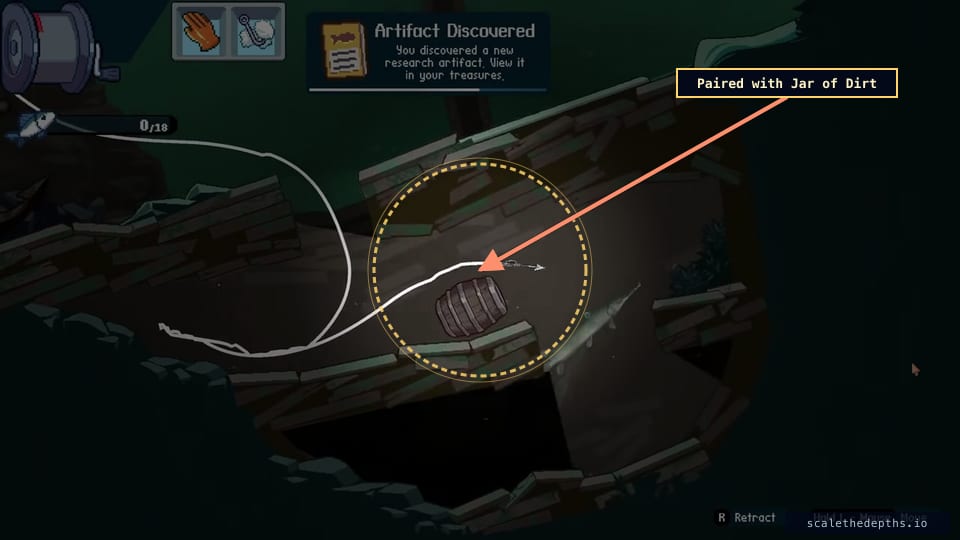
Canned Bread →
Outer Banks' fifth artifact and the second half of the middle pickup chain — a tin of preserved loaf you scoop up moments after the Jar of Dirt, just before the run forks toward the southwestern-path shortcut.
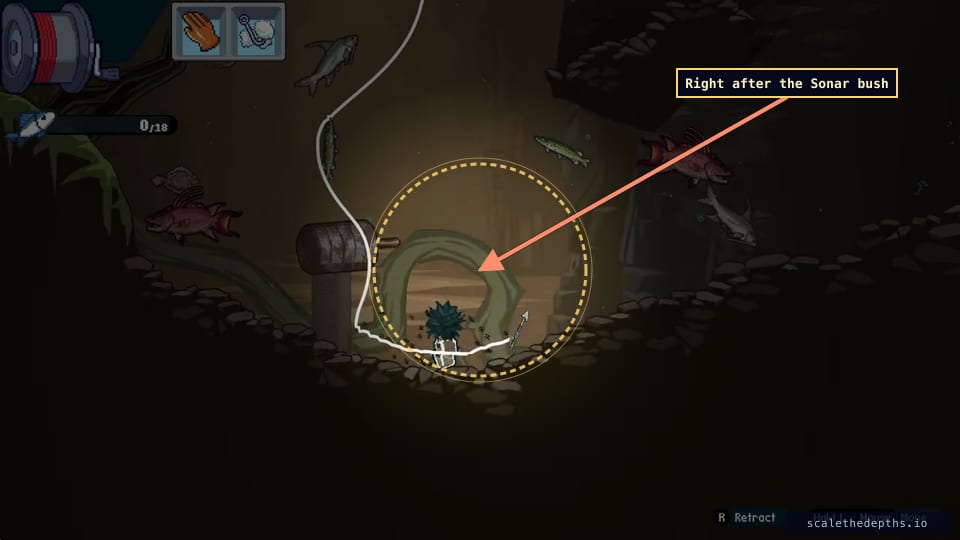
Jar of Dirt →
The fourth Outer Banks artifact and the stage's cheekiest pull — a sealed jar of plain dirt sitting one beat past the Sonar Receiver bush, begging to be swept up in the same dive as the Canned Bread.
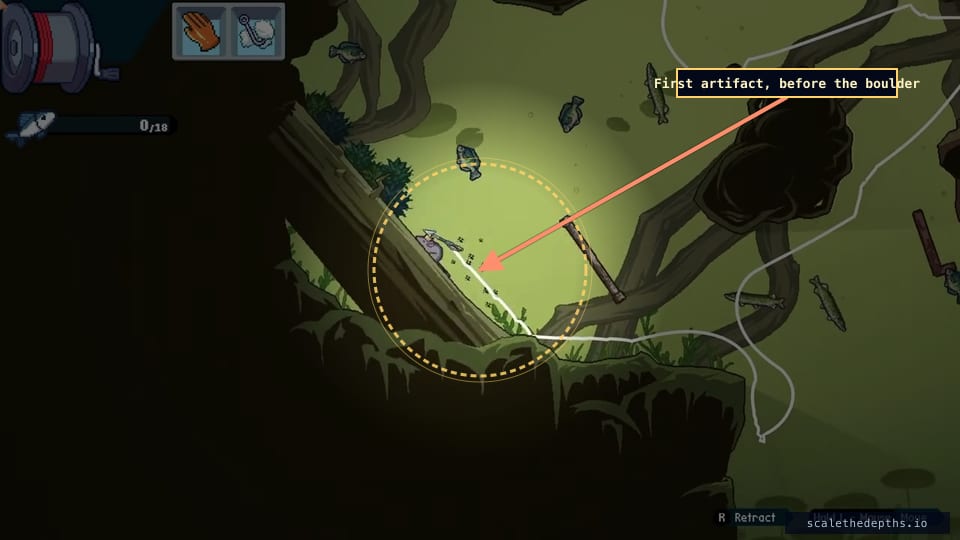
Rat King Plush →
The very first artifact in Outer Banks — a goofy knotted-rat plush you snatch on the opening run, the beat before you drop the boulder that reroutes the dive.
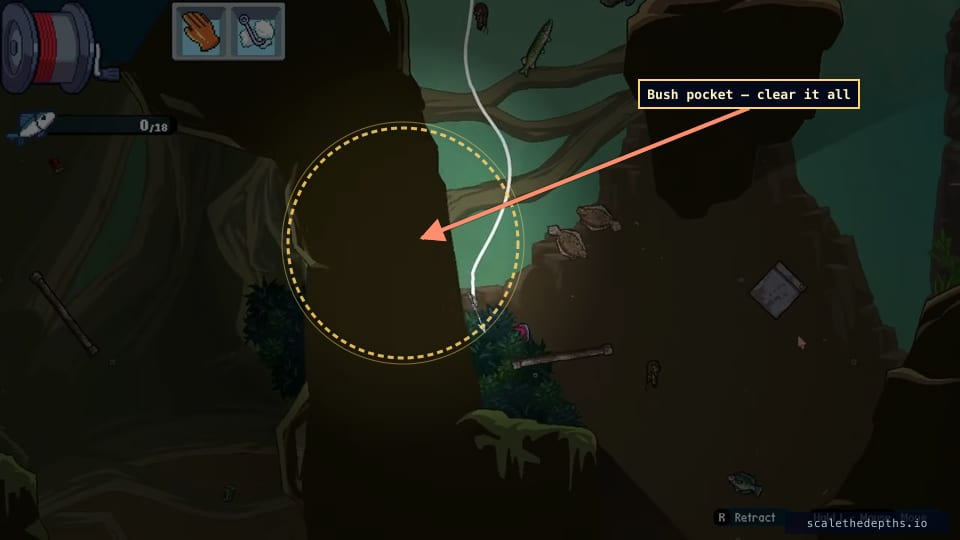
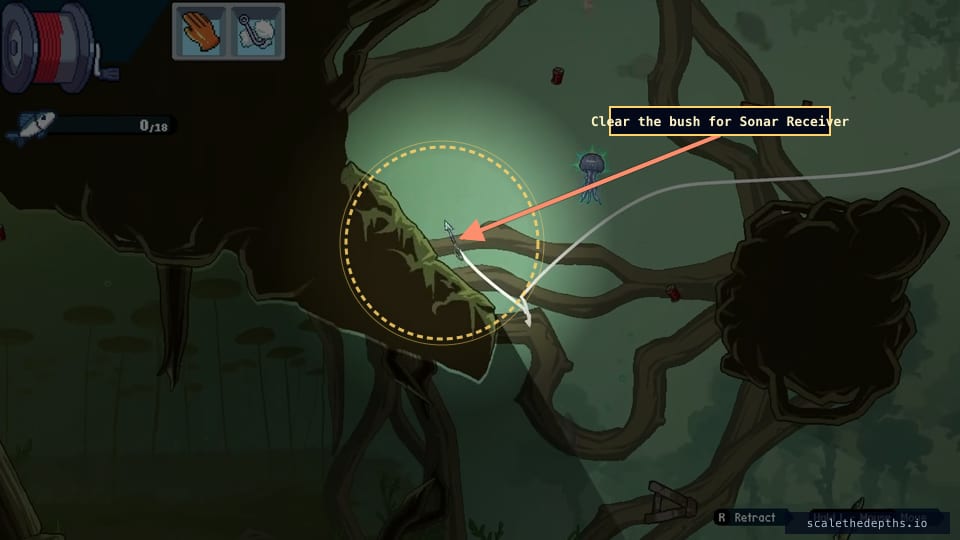
Sonar Receiver →
The artifact behind almost every Outer Banks 5/6 — buried inside a bush pocket that only gives it up if you destroy the whole bush, not just cut a path through.
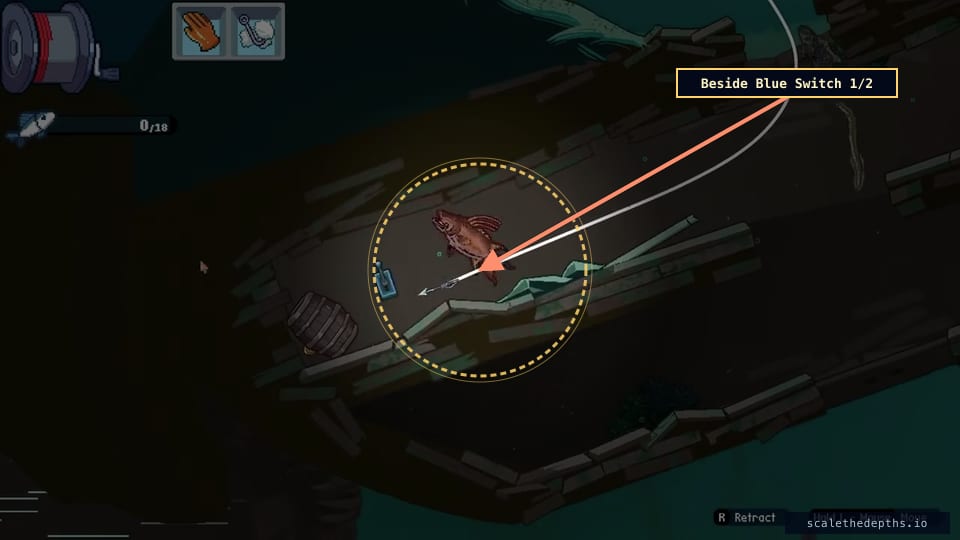
Spanish Doubloon →
The sixth and final Outer Banks artifact — a gold pirate coin sitting right beside Blue Switch 1/2, and the kind of late pickup players flip the switch and swim straight past.
Outer Banks is Stage 3 of Scale the Depths, off the coast of North Carolina. It's a cleanup-and-shortcut level: 5 messages, 6 artifacts, 2 baits, 2 cosmetics, a boat blueprint and two blue switches, capped by the legendary fish Lost Dimetrodon. The catch is that several pickups are gated by line length — if a pocket feels unreachable, the rod is usually the blocker, not a puzzle. This guide follows the safe 100% order and ends with the question players actually search: why Outer Banks won't show 100%.
⚙ Before You Start — Gear Priorities
Outer Banks is gated by gear as much as by route. Several pickups sit behind distance and fish-fight time, so prioritise line length before knife upgrades for a clean 100% run.
Prioritise line length — Industrial Rod V6 ($1,800) is the upgrade to aim for.
Why: Outer Banks hides pickups behind distance and side routes. If you can't reach a pocket, line length is usually the blocker.
Use a stronger hook before the final legendary-fish attempt.
Why: It's a moving multi-hit chase — weak hook damage turns the fight into a time sink.
Upgrade the knife after line and hook feel comfortable.
Why: A better knife cleans up big-fish prep but doesn't unlock routes the way line length does.
Start with empty storage before the boat blueprint or Lost Dimetrodon.
Why: A full bag can force you out before you finish the dive's actual goal.
◇ 100% Route — In Order
- Opening route
Grab Message 1, the money chest and unlock the first shortcut.
Tip: The early shortcut gives you a faster return path before the long routes open.
- Early artifact route
Pick up the Rat King Plush, then drop the boulder to change the route.
Tip: Grab Rat King Plush before treating the opening route as finished.
- Compass route
Collect Message 2, the Compass bait, a money chest and the Bio-specimen Containment Unit.
Tip: Compass is the earlier of the two baits — don't leave it while chasing artifacts.
- Legendary fish marker
Note the Lost Dimetrodon route, but save the real catch for the end.
Tip: Treat the first sighting as a route marker, not a fight.
- Cosmetic + Sonar Receiver
Grab the first cosmetic, then fully clear the bush to uncover the Sonar Receiver artifact.
Tip: Don't cut just enough to pass through — clear the whole bush pocket until the artifact appears.
- Middle artifact chain
Collect Jar of Dirt and Canned Bread, then unlock the southwestern path shortcut.
Tip: These sit in one chain right after Sonar Receiver — sweep them together.
- Late blue-switch route
Message 3, Spring bait, Message 4, Blue Switch 1/2 + Spanish Doubloon, second cosmetic, then Blue Switch 2/2.
Tip: Blue Switch 1/2 is paired with Spanish Doubloon — hit the switch and grab the artifact in the same pass.
- Late boat route
Message 5, a money chest and the Boat Blueprint.
Tip: Get the boat blueprint before your final Lost Dimetrodon attempt.
- Legendary fish cleanup
Return with empty storage, catch Lost Dimetrodon and prep it.
Tip: Catching isn't enough — finish the prep before checking completion.
▣ Artifacts
Early artifact route, before the boulder drop.
One of the first artifacts — easy to assume you'll remember it later.
After Compass bait and the nearby money chest, before the Lost Dimetrodon marker.
Part of the middle route, not the final fish cleanup.
Between the first cosmetic and the Jar of Dirt route, before the southwestern path shortcut.
Hidden inside a bush — clear the full pocket. The #1 cause of a 5/6 artifact count.
Middle artifact route, immediately after the Sonar Receiver pocket.
Same chain as Canned Bread — do them together.
Same middle chain as Jar of Dirt, before the southwestern path shortcut.
Don't split this from the Jar of Dirt pass.
Late blue-switch route, beside Blue Switch 1/2.
Don't hit the switch and leave — the artifact is right there.
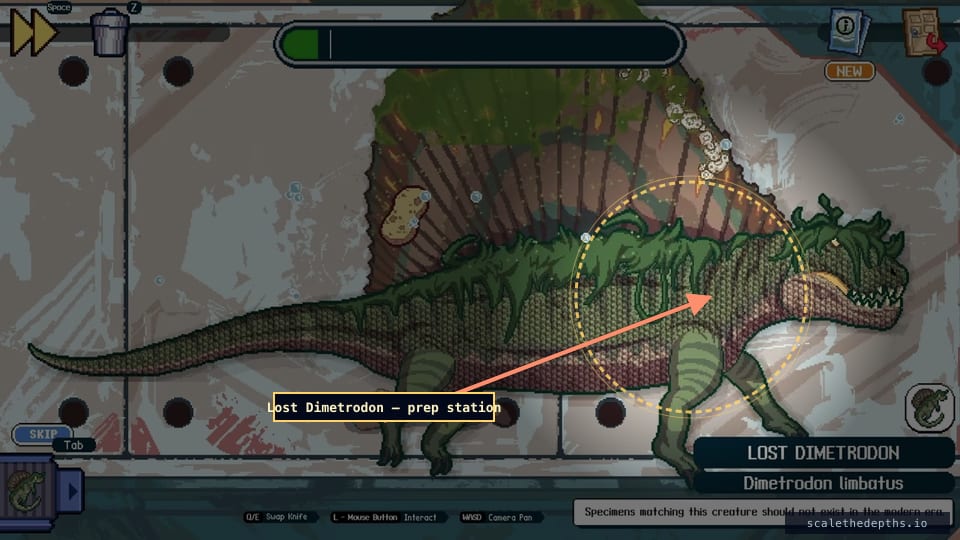
🐟 Legendary Fish — Lost Dimetrodon
Where:Spotted during the middle section; the real catch is at the end of the route after all collectables.
- Find the Lost Dimetrodon route early, but treat the first sighting as a marker — don't start the fight while still cleaning collectables.
- Return with enough line, a stronger hook and empty storage. It's a moving multi-hit fish that punishes weak hook damage.
- Lead the fish — aim ahead of where it's moving, not where it currently is. It pulls away as you approach.
- If you keep running out of line or dive time, leave, upgrade line length or hook, and come back through the cleanest shortcut.
- Catching is not the finish line — Lost Dimetrodon isn't done until it's prepped.
- Pan the camera to see the full sail-backed body before starting.
- Work in controlled passes; slow down around the sail, head and tight highlighted sections.
- Don't rush the final cuts once most of the bar is full.
☑ 100% Checklist
- 5 messages in bottles
- Rat King Plush
- Bio-specimen Containment Unit
- Sonar Receiver
- Jar of Dirt
- Canned Bread
- Spanish Doubloon
- Compass bait
- Spring bait
- Both cosmetics
- First shortcut + boulder route + southwestern shortcut
- Blue Switch 1/2 and 2/2
- Boat blueprint
- Lost Dimetrodon caught and prepped
✖ Why It Won’t Show 100%
If Outer Banks won't show 100%, it's almost always a hidden or late-route item, not a normal fish. Use the symptom in your tracker to jump to the most likely miss.
Recheck:The bushy extra-line pocket between the first cosmetic and the Jar of Dirt route, before the southwestern path shortcut. Clear the whole bush.
Recheck:Go back to Blue Switch 1/2 and grab the artifact before moving to Blue Switch 2/2.
Recheck:Compass is early; Spring is later, before the blue-switch chain. Rerun that late route.
Recheck:First is before the Sonar Receiver pocket; second is near the late blue-switch route.
Recheck:Outer Banks has 5 messages — recheck the opening route, the blue-switch route and the late boat-blueprint route.
Recheck:Confirm the boat blueprint, Sonar Receiver and Lost Dimetrodon prep before assuming Point Nemo is bugged.
⌕ Common Questions
Why is Outer Banks not showing 100%?
You're probably missing a hidden or late-route item rather than a normal fish — most often the Sonar Receiver, Spring bait, Spanish Doubloon, a cosmetic, the boat blueprint, or Lost Dimetrodon prep. Use the troubleshooting table above.
Where is the Sonar Receiver?
Before the southwestern path shortcut, after the first cosmetic and before the Jar of Dirt / Canned Bread chain. It's hidden in a bush — clear the full pocket, don't just cut a path through.
How many messages are in Outer Banks?
Five messages in bottles. If your count is short, rerun the opening route, the blue-switch route and the late boat-blueprint route.
Why can't I reach some Outer Banks pickups?
You probably need more line length. Prioritise rod upgrades for cleanup — especially Industrial Rod V6 when it's available — before assuming you missed a puzzle step.
Why is Point Nemo still grey or locked?
Recheck Outer Banks completion. The boat blueprint, Sonar Receiver and Lost Dimetrodon prep are the first things to verify before assuming the next area is bugged.
Does Lost Dimetrodon count as done when I catch it?
No — catch it, then finish the prep step. Catching it and leaving can keep your legendary-fish progress incomplete.
Why the Outer Banks legendary fish is a Dimetrodon
Outer Banks is a real chain of barrier islands off North Carolina, famous for shipwrecks and the 'Graveyard of the Atlantic' — which is why the game salts it with a Spanish Doubloon and a Sonar Receiver. The legendary fish, in-game named Dimetrodon limbatus, is the strangest pull: Dimetrodon was a real sail-backed synapsid that lived around 295–272 million years ago, before the dinosaurs, and it wasn't even aquatic. The game knows it's an anachronism — the catch card reads 'Specimens matching this creature should not exist in the modern era.' Dragging a Permian land predator out of the Atlantic is exactly the kind of impossible trophy the legendary fish are built around.